
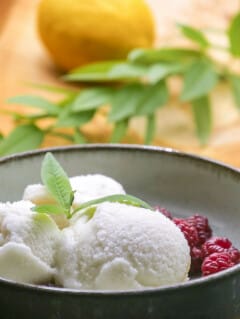
Here’s my recipe for vanilla and muscovado ice cream, which is also my first (and successful 😋) homemade ice cream. I’ve actually taken up making ice cream ever since my mom gave me her old ARPI ice cream maker. It’s the machine she used to make us delicious sorbets with fruit from the garden when we were kids.
I’ll write a post dedicated to ice cream makers in a little while, but let’s focus on the recipe for now.
Vanilla beans and muscovado… what?
I wanted to create an ice cream that wasn’t too sweet, yet was creamy and flavorful at the same time. To achieve this, I had to adjust the quantities of dairy products (milk and cream), egg yolks, and of course, the sugar itself. For the sugar, I added my own personal touch and replaced the traditional white or light brown sugar with muscovado.
For those unfamiliar with muscovado, it’s a barely refined cane sugar, and therefore very rich in natural molasses. This gives it a dark brown color and a strong, slightly caramelized flavor. I often use it in my sweet recipes (panna cotta, cheesecake, …), and it always adds an extra touch of character and originality. Another advantage of this sugar, in my opinion, is that it has a slightly lower glycemic index (GI) than refined sugar.
In short, after making my ice cream with the chosen proportions, I was delighted with the result. I even received compliments today from my friends’ 7-year-old son, which was the ultimate test for my ice cream 😅
Because of the muscovado, the ice cream looks a bit darker than classic vanilla ice cream. It’s no less flavorful, though, since I used real vanilla beans instead of an extract or vanilla sugar. Admittedly, it’s a bit more expensive, but the result is incomparable. But in addition to the vanilla flavor, you’ll notice a subtle, indulgent hint of caramel—that’s the “muscovado effect”!
That said, if you don’t feel like buying or trying muscovado, you can definitely make this ice cream using regular white or light brown sugar. The quantities are exactly the same.
Down to the degree🌡
In terms of preparation, this ice cream is a bit technical, at least the first time around. You need to make a custard, and in this case, it’s the coagulation of the egg yolks that gives it its creaminess. To achieve this, you must cook the custard at a fairly precise temperature, ideally 83°C:
- Below that, the yolks won’t coagulate and the custard will remain runny.
- Above that, the yolks will cook, turning into "scrambled eggs," and make your custard lumpy.
For this part of the recipe, I recommend using a cooking thermometer; it’s an inexpensive and truly handy tool. Besides custard, it will also come in handy for frying.
Once the custard is made, you’ll need to let it cool for at least 5 hours, and then you can churn it to make your ice cream. Allow another 2½ to 3 hours for it to set completely and be ready to enjoy. So, in short, this ice cream takes some effort, but the result will be well worth it.
Let’s get started!
There you go—I hope I’ve inspired you to try making this vanilla and muscovado sugar ice cream. If so, I wish you lots of fun in the kitchen, and may your ice cream maker spin smoothly!
Enjoy 😋 and thanks in advance for your comments!


Leave a comment on this post